Earlier this year at Developer Nation, we announced our new mission – Empowering developers and software creators worldwide to shape the future of technology through research and community. We also decided to take things away from the screens and meet our community where they are. Hence, I attended the API World and Dev Innovation Summit 2024 in Santa Clara this November. It was an incredible experience, and I’m excited to share some highlights with you!
The Venue and Organization
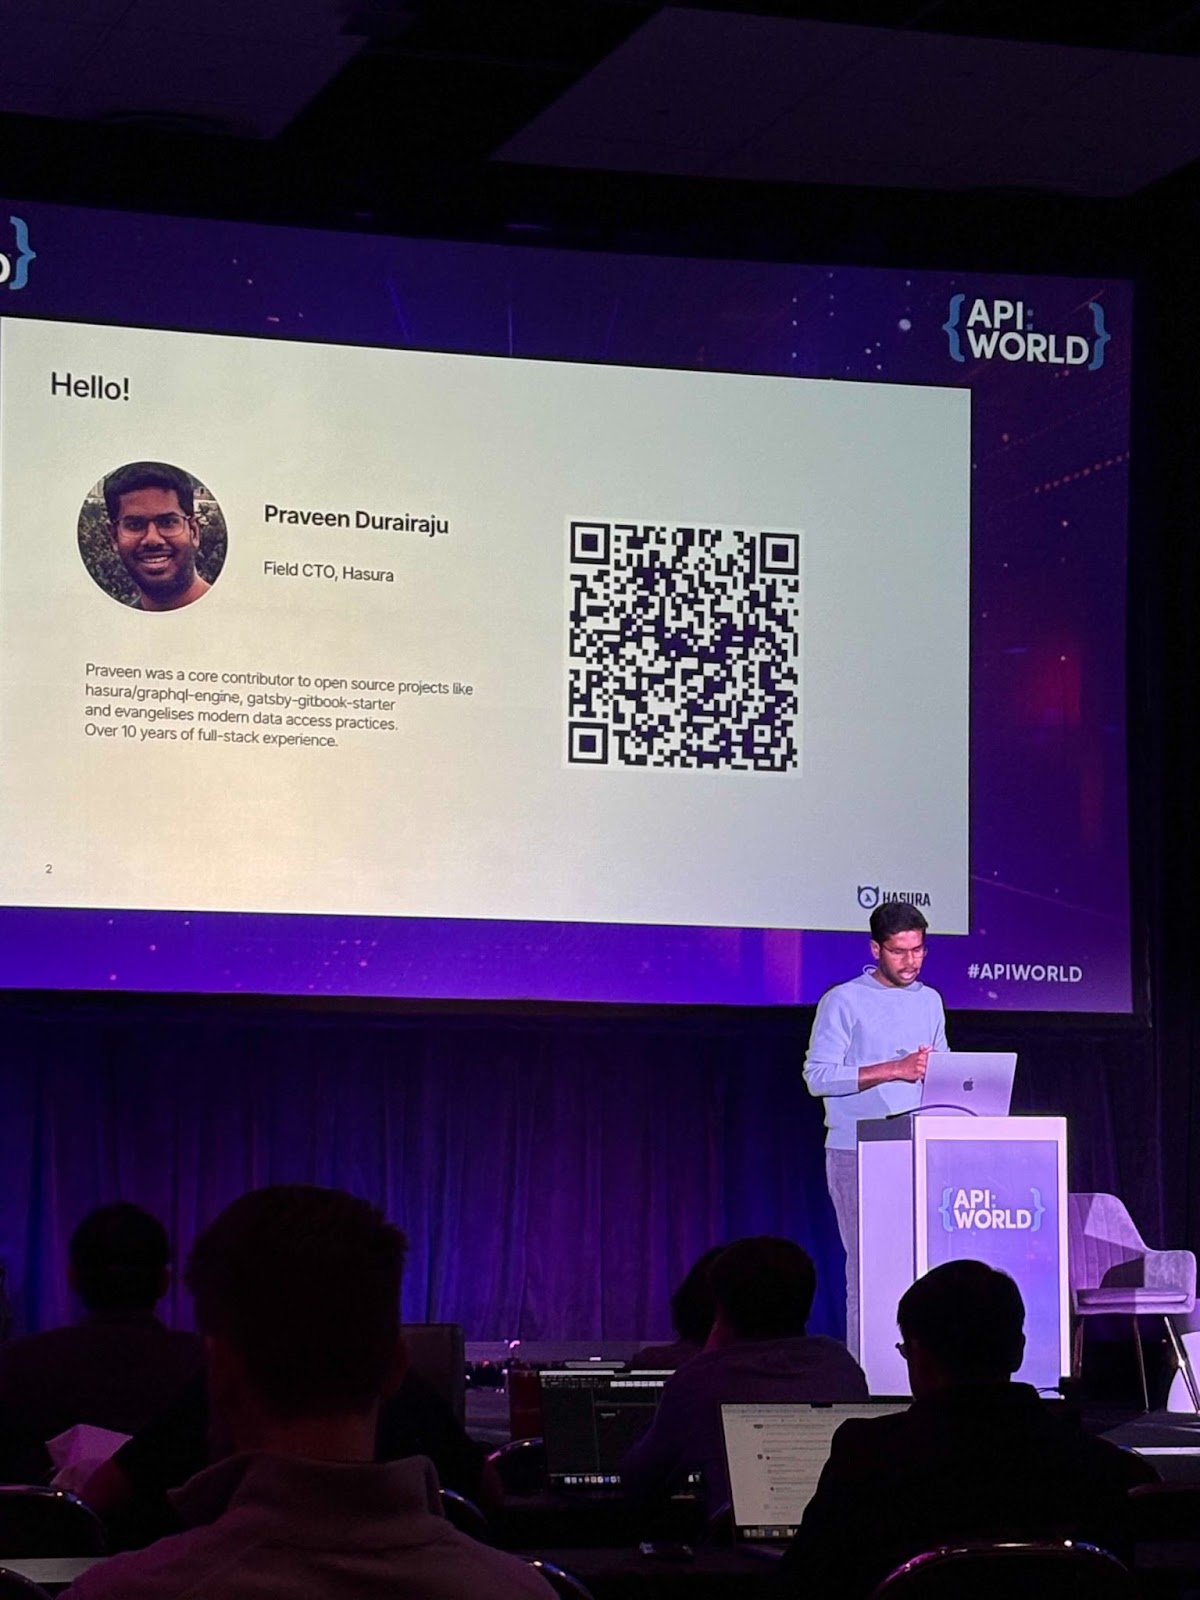
First, the venue (Santa Clara Convention Centre) was simply impressive! It was right next to the famous Levis stadium of Santa Clara. Everything was super well-organized, from the registration process to the booth layout, making navigating and engaging with the event easy. A thoughtful touch was the QR codes on attendee badges, which made post-event connections seamless. If you’ve ever had trouble remembering who you spoke with after an event, this was a game-changer!
Booths and Swag
The booth area was another standout feature—perfectly organized, with companies showcasing creative solutions to help developers tackle challenges across the API development and management lifecycle. And let’s talk about the swag! From soft plushies and custom Lego kits to T-shirts and stickers, the booths truly brought their A-game. Tesla also had a booth, and I got to test drive their Cybertruck. How crazy is that xD.
Talking about Swags and Prizes, we’re giving away a ton of them. All you have to do is participate in our 29th Developer Nation survey and win prizes like Rode NT USB microphone, Lego kits and more. Participate now, and let’s shape the future of technology together.
Talks, Demos, and AI Conversations
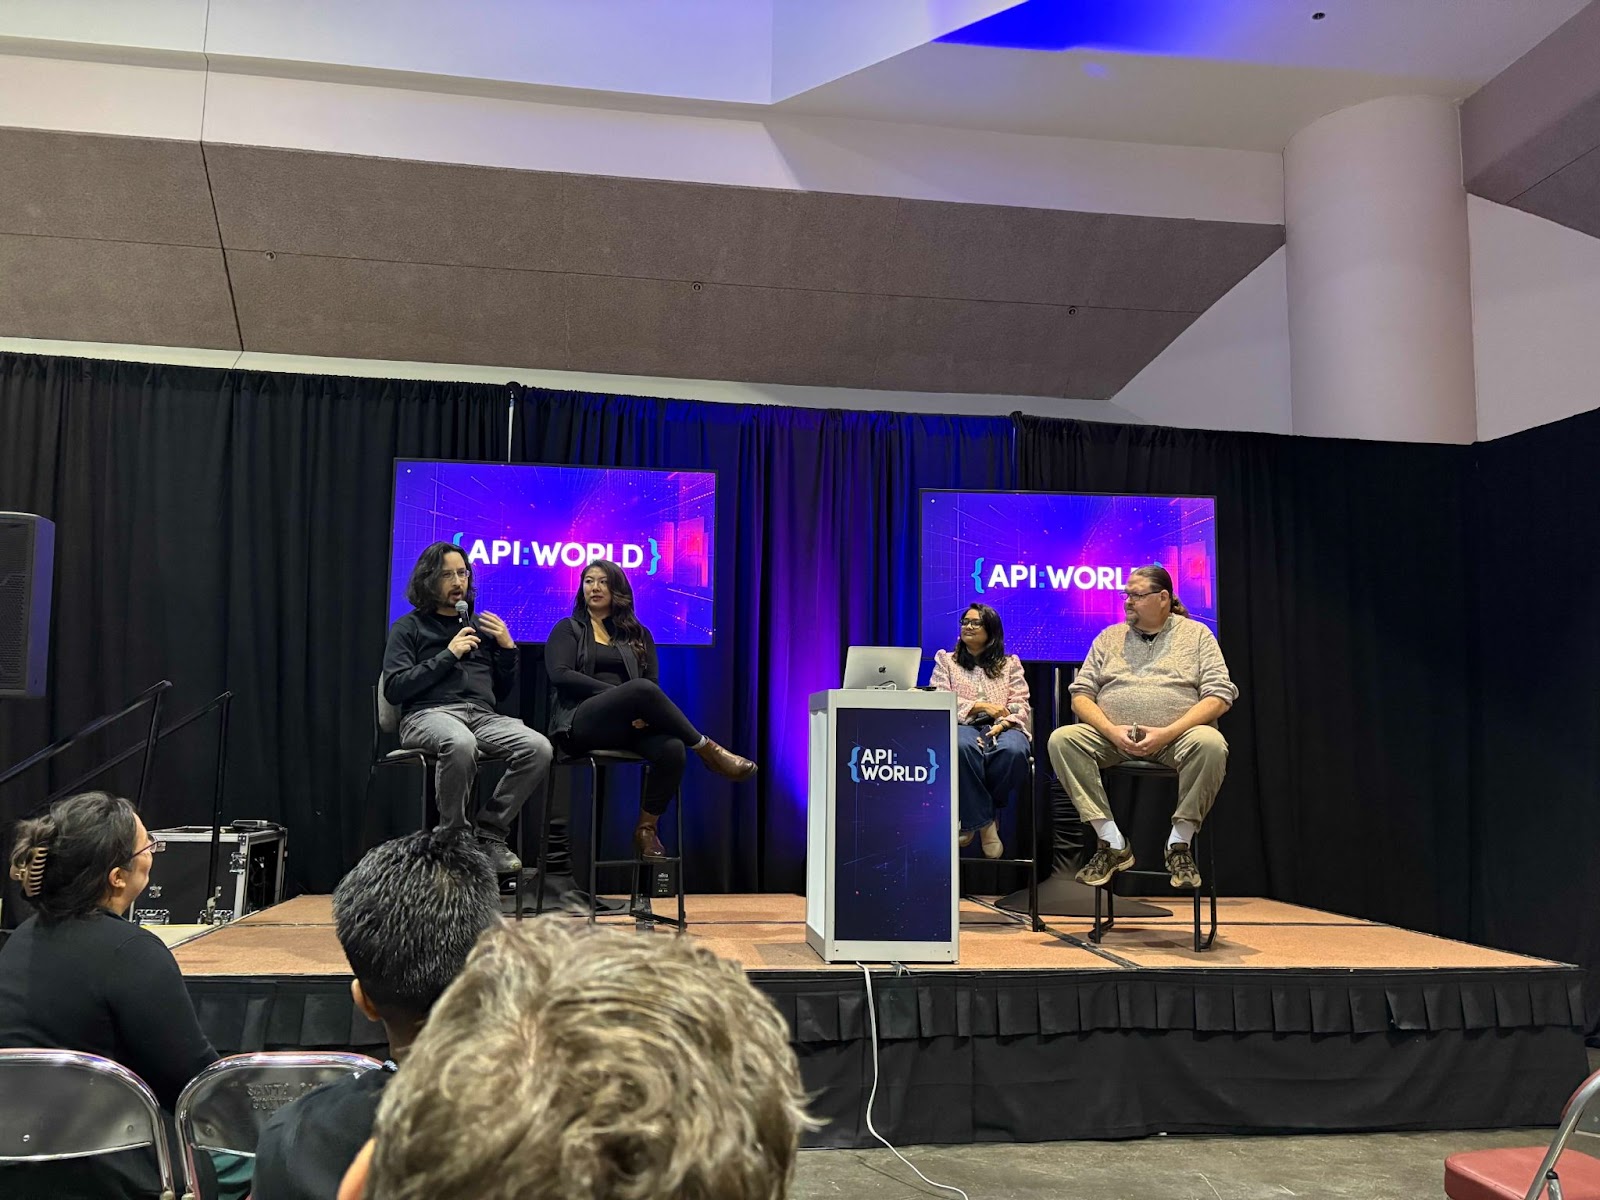
Some of the talks were incredibly resourceful, providing insights we can apply daily. I especially enjoyed demos by companies like Traefik and Hasura. Artificial Intelligence was immersed everywhere this year; almost all the booths I stopped by had something to share about AI, a feature they recently added to their product or something they’re considering in the future. It was also fascinating to hear contrasting opinions on AI —some optimistic, others cautious—but all thought-provoking. Discussions around AI added depth to the event and sparked plenty of conversations.
Networking and Connections
One of the best parts of API World was meeting interesting people and forming meaningful connections. The event created a great environment for networking, and I walked away with not just new contacts but new perspectives as well.
Dedicated Media Boxes
The dedicated media boxes for recording interviews and podcasts were a huge plus for those who create content. They made it easy to capture interviews and sessions without the typical background noise of an event. Unfortunately, being a solo rider this time, I couldn’t make the most out of it, but I’m surely looking forward to next time when another team member could join me during the conference.
What I’d Love to See Next Time
While the event was fantastic overall, there’s always room for improvement. Here’s what I’d love to see next year:
– More technical talks with a balanced mix of hands-on sessions and sponsor tool walkthroughs.
– More panel discussions and fireside chats on emerging topics to encourage diverse perspectives.
– Opportunities for developers to present topics on the fly or share their thought leadership.
Final Thoughts
Attending API World 2024 was a rewarding experience, both professionally and personally. It’s inspiring to see so many companies working to make developers’ lives easier, and the event reinforced the importance of our shared mission at Developer Nation.
If you’re curious about any of the tools or ideas discussed at the event, feel free to reach out—I’d love to chat about them! Let’s keep building and shaping the future of technology together.
Have you attended any events like this recently? Share your experiences in the comments—I’d love to hear about them! 🚀
As artificial intelligence (AI) and machine learning (ML) become more deeply woven into the fabric of our daily lives, from healthcare and financial services to self-driving cars, questions around their ethical implications are becoming increasingly urgent.
While ML learning systems are powerful, they can unintentionally perpetuate human biases, impact individual rights and even raise existential risks if not developed with careful consideration.
Unchecked and unregulated AI and ML systems can result in biased algorithms. If algorithms are biased, the information they churn out will be biased and flawed. As a result, people using AI to make decisions with a genuine desire to better humanity may unintentionally violate human rights.
In this blog, we will explore how AI can be ‘poisoned’ and some of the consequences that can arise from unethical uses of AI and ML, followed by five techniques you can use to ensure you are ethically and responsibly developing your AI and ML models.
AI poisoning and its consequences
AI poisoning is a type of attack aimed at corrupting AI systems. Poisoned AI systems are compromised, which can have severe consequences.
AI or data poisoning happens through the following methods, leading to several ethical risks.
Data injection
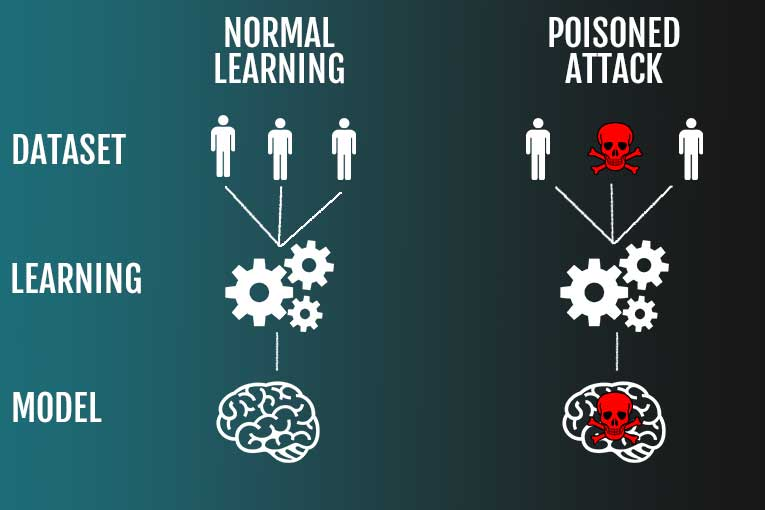
Devlopers build AI systems by feeding an AI algorithm data and information about a specific topic. The AI learns about the topic and uses the information to provide new information or make predictions–known as predictive analytics.
A simple illustration of how model poisoning works. (Image source)
For example, a healthcare AI model might be trained on thousands of medical records, symptoms, and treatment outcomes to help it identify patterns and assist doctors in diagnosing illnesses. This process allows the AI to learn from vast amounts of historical data, enhancing its ability to make predictions or recommendations based on similar patterns in new data.
But what happens if the data the AI is learning from is biased? Injecting malicious data distorts and corrupts what the AI model can learn, which generates discriminatory and inaccurate results. In the case of healthcare, it might predict an inaccurate diagnosis.
Mislabeling attacks
Mislabeling attacks involve deliberately altering the labels in the training data, which can cause an AI model to make incorrect associations. For instance, labeling images of horses as cars can lead an image recognition system to misidentify horses as vehicles. This technique introduces hidden biases into the model, skewing its judgment in ways that might not be immediately noticeable but could profoundly impact its performance.
Targeted attack
Targeted attacks aim to manipulate AI models to behave in a specific way for certain inputs while seemingly unaffected overall performance. These attacks create subtle vulnerabilities that are challenging to detect. Such targeted manipulation can result in dangerous, unpredictable behaviors in intelligent systems, particularly in high-stakes applications like self-driving cars or autonomous systems used in the private sector.
Whether done intentionally or unintentionally, AI/data poisoning results in:
Biased decision making
A biased AI system may make discriminatory decisions in areas like hiring, loan approvals, or criminal justice. These decisions reinforce harmful stereotypes and human biases, which threaten civil liberties.
A 2020 study showed Instagram potentially perpetuating harmful body image stereotypes with its AI algorithm, giving pictures of shirtless men or women in their underwear priority over more clothed images. (Image source)
Misinformation and propaganda
Sadly, some bad actors can compromise language models and weaponize them to produce large amounts of misleading or false information. This can be damaging in global or regional processes such as general elections.
In 2016, Facebook allowed access to sensitive user data of 87 million users to consulting firm Cambridge Analytica, which used AI algorithms to micro-target political ads in the 2016 elections in the United States. This raised severe concerns about data privacy and the ethical use of AI in influencing political outcomes.
Privacy violations
Poisoning attacks can also extract or expose sensitive information from AI models. Inadvertently revealing private data due to a compromised model violates individual rights and is an ethical failure. Data privacy is a core principle of responsible AI, and poisoning attacks directly challenge this.
Malicious code injection
Sometimes, poisoned ML models have been shown to act as vectors for malicious code. Attackers could use AI to execute unauthorized actions on users’ systems by inserting code directly into the training process, creating security risks beyond unethical AI use to outright harm.
Data poisoning exemplifies how the exploitation of AI if unprotected, emphasizing the need for ethical principles and rigorous safeguards in AI development.
Five ways to ensure ethical AI in ML models
As has been demonstrated, ensuring ethical AI when developing models is the responsible thing to do. Here are five techniques that can be employed.
Data collection and preparation
Ethical AI naturally starts at the point of data collection and preparation. Developers working on AI models should ensure they collect diverse data representative of the population the model will serve.
Consider collecting data from a wide range of sources. Sticking with our healthcare AI example, this would mean gathering data on patients from different:
Hospitals
Regions
Populations
Ages
Genders
Races
Medical histories
In other fields, it might involve collecting data from urban and rural areas, varying income levels, religions, and cultural contexts. The type of data collected depends on the model your are developing. When you use diverse sources, you minimize biased outcomes.
Of course, collecting diverse data isn’t the end of responsible data management. You need to make sure you’ve gathered the necessary approvals and consent. Users should know how you plan to use their data and have the option to opt in or out at any time. For example, suppose you are using AI for customer service (such as through chatbots). In that case, customers should know that their purchase history and previous interactions with the company may be used to train the model.
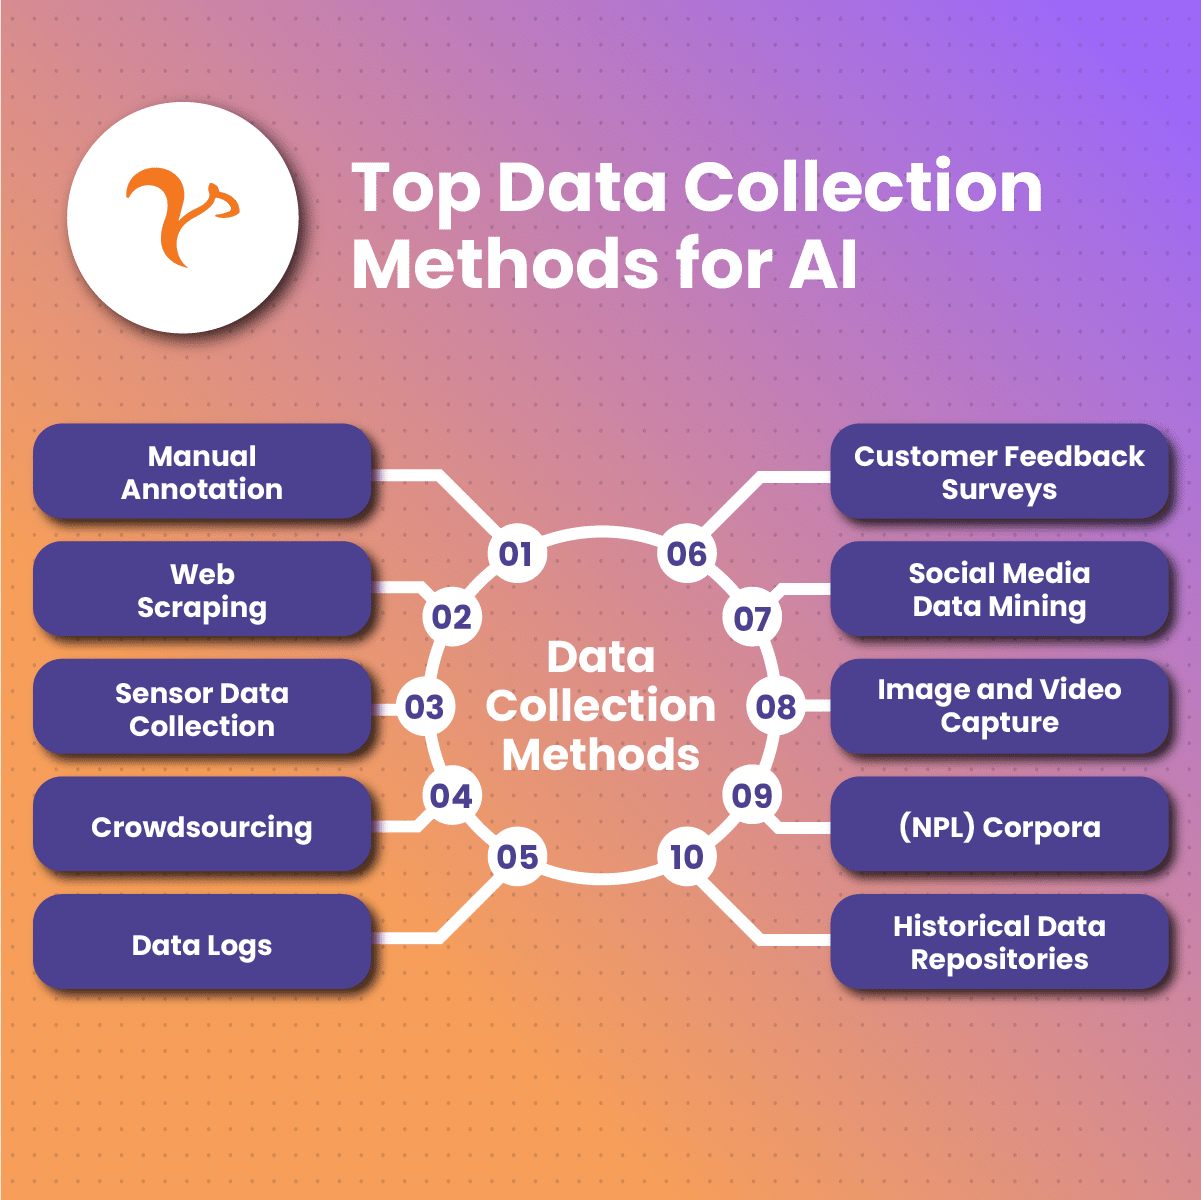
Here are some methods of collecting data. (Image source)
Additionally, being transparent about how you’re collecting and using data breeds trust. So, suppose you’re a commercial enterprise using a model to serve your e-commerce or finance customers. In that case, transparency can give you a competitive advantage over others who may collect data legally but unethically.
It’s worth noting that collective diverse data doesn’t automatically eliminate bias. Once you have the data, prepare it using techniques like data augmentation (using the data to create new data samples to assess bias) or resampling (re-collecting sample data). This added step helps create a fairer ML model. Bright Data sets a solid example in making transparency and consent key parts of its data collection process.
Data access and security
Ethical AI includes managing how data flows into ML systems. API gateway services play a crucial role by filtering requests, enforcing access policies, and logging interactions to prevent unauthorized data usage.
Businesses can uphold data integrity and transparency by controlling data access and usage through a gateway, mitigating biases, and safeguarding user privacy. This integration of API gateways not only strengthens compliance with ethical standards but also adds a layer of accountability, reinforcing trust in AI-driven solutions.
Another way to uphold data security is through rigorous testing and auditing of ML models.
Security control validation, which thoroughly assesses the effectiveness of safeguards like access restrictions, encrypted data storage, and monitoring systems, helps ensure the integrity of sensitive training data and model outputs.
Conduct this validation process regularly as the security landscape evolves. By prioritizing security alongside ethical AI practices, organizations can have greater confidence that their ML systems behave as intended and do not expose users to undue risk.
AI risk management
Ethical AI models require careful planning to avoid risks like biased predictions or privacy issues. This is where AI risk management becomes essential. It helps organizations identify potential problems early and implement safeguards to keep AI systems transparent and fair.
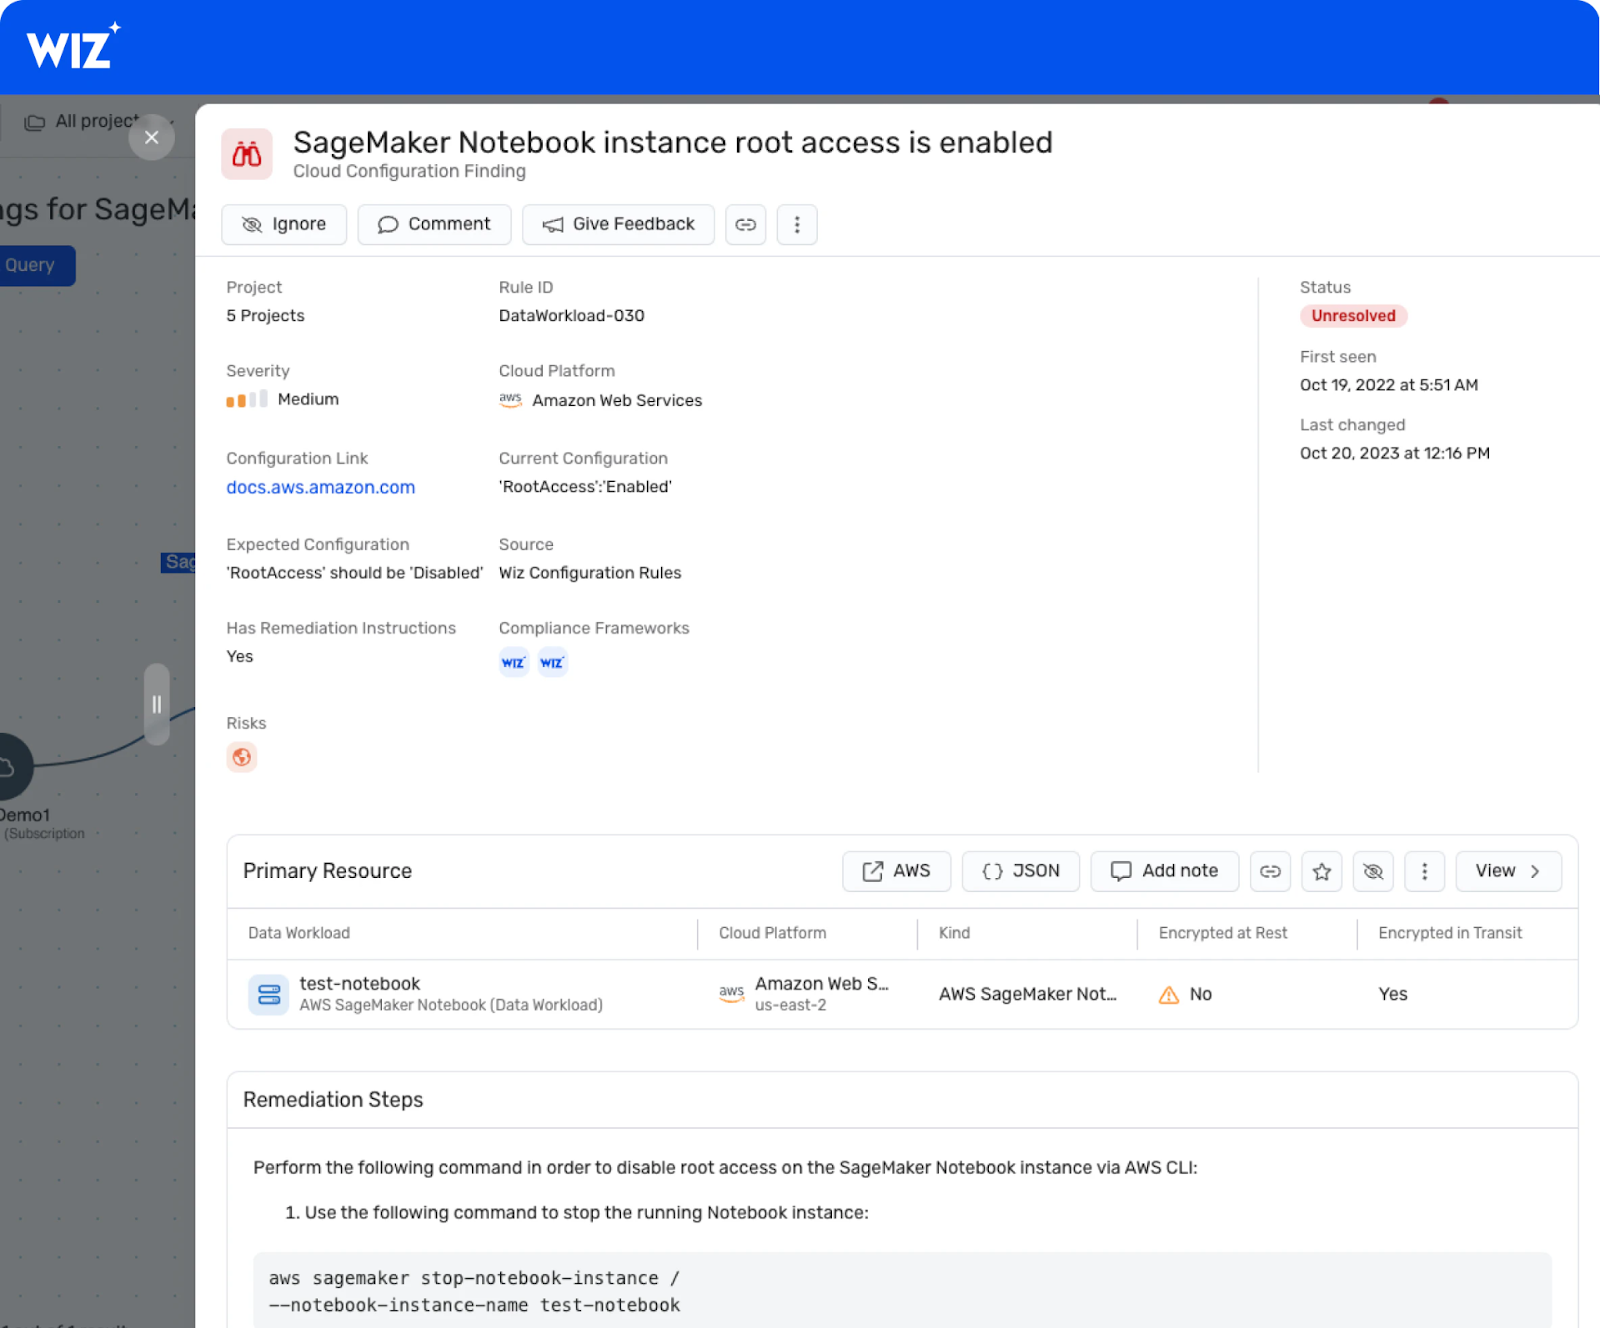
Wiz.io explains that this approach ensures companies can detect and fix issues, such as unintentional bias or data misuse before they cause harm. Proper risk management also ensures that AI models meet industry standards and build trust with users by being accountable and fair throughout their lifecycle.
Model development
To ensure that AI models make ethical and fair decisions, developers can implement fairness constraints during model training.
Fairness constraints prevent discrimination against specific groups, helping the model avoid skewed outcomes.
Techniques like adversarial debiasing and regularization can be applied, where the model is penalized for biased predictions, encouraging it to treat different groups equitably. These constraints are especially crucial in areas where biased algorithms could impact civil liberties.
Another essential aspect of responsible model development is using interpretable or glass-box AI models whenever possible.
Interpretable models provide a transparent view of their decision-making processes. This transparency helps developers understand how the model reaches specific conclusions, making it easier to detect and address potential biases.
Interpretable models enhance accountability by allowing users to trace each step in the decision-making process, promoting fairness in ML.
For models that require additional clarity, developers can employ explainability techniques such as Local Interpretable Model-agnostic Explanations (LIME) and SHapley Additive exPlanations (SHAP).
These methods break down individual predictions and offer insights into the model’s overall behavior, enabling a deeper understanding of how various factors influence outcomes.
Another way to evaluate fairness in model development is using humans. Encourage team members and the general public (who represent your target audience) from diverse backgrounds to provide input on your model’s outputs.
Monitoring and evaluating models
Regular ethical reviews play a crucial role in monitoring and evaluation. These reviews involve periodic audits assessing the AI system’s alignment with desired ethical principles. These reviews are particularly important for evaluating the model’s impact on vulnerable or marginalized groups, helping to identify and address any unintended consequences that may arise over time.
Continuous monitoring in real-world scenarios further reinforces ethical alignment, providing insight into how the model performs under real-life conditions and enabling swift adjustments if ethical standards are compromised. Establishing clear ethical guidelines or a standard operating procedure (SOP) helps ensure that these reviews and monitoring practices are consistently applied, creating a robust framework for ethical AI management.
Wrapping up
Technological advances are exciting. The AI explosion is akin to the Industrial Revolution, and we are fortunate to live in an era when we see advances happening right before our eyes.
However, progression always comes with challenges and risks, and our responsibility is not to be swayed by technology at the expense of ignoring threats to our human rights.
This blog has examined what can happen when things go wrong and offered techniques to minimize harm.
Enjoy using AI to superpower your business—but be responsible!
Author bio
Guillaume is a digital marketer focused on handling the outreach strategy at uSERP and content management at Wordable. Outside of work, he enjoys his expat life in sunny Mexico, reading books, wandering around, and catching the latest shows on TV.
Increasingly more companies and entrepreneurs are investing in software product development to solve their specific business needs or satisfy customers’ demand for innovation. As a result, the global software product market is expected to grow from $1449 billion in 2023 to $2529 billion by 2028, according to Research and Markets.
Whether a software product is intended for internal or external use, developing it is never easy. Project teams must not only gather product requirements and then design and develop a solution but also test and deploy it while keeping to the agreed budget and timeline. Any inefficiencies and issues emerging during these activities can increase the software’s time to market and compromise its quality.
Luckily, developer teams can use AI technology to streamline all stages of software product engineering and thus build high-quality software products faster. This article highlights seven improvements AI can bring to your software product development project.
But before we dive into it, here’s your chance to win cool prizes like Rode NT USB microphones, Lego kits, and more. Participate in our 29th Developer Nation survey, and let’s shape the future of technology together! Take the survey now!
More efficient business analysis
Business analysis is the first step in a software development project where the team clarifies a company’s goals and requirements for the future product and assesses market demand. However, the business analysis stage can be time-consuming, especially when the project is large or there are many stakeholders, which can increase time to market and thus cause potential revenue loss for businesses.
AI can significantly accelerate business analysts’ work by automating some of their most labor-intensive activities. For example, AI can be used to transcribe stakeholder interviews and turn free-flowing natural speech into properly documented lists of software requirements.
In addition, AI can assist business analysts in market and competitor research. AI algorithms can parse consumer reviews about a competitor’s product across the web so analysts wouldn’t have to do it manually. These tools can also run sentiment analysis of the reviews to help analysts understand what people think about a competitor’s solution and assess its weaknesses and strengths. By studying the results of the analysis, a developer team can determine how to differentiate their product.
Improved product design
Due to the emergence of advanced AI-powered tools, developer teams can design software much faster and more efficiently. There can be numerous applications for AI in software design, with architecture design and mockup generation among the most popular use cases.
For instance, AI algorithms can help solution architects create product architecture blueprints based on predefined requirements and rules. AI-powered predictive analytics, in turn, allows solution architects to forecast the effect of various architectural solutions in terms of scalability, performance, and software security, which can help design more reliable products.
Additionally, AI can help software designers generate initial drafts of future products faster. Based on design specifications, AI algorithms can also generate high-resolution product mockups in just a few minutes or even perform automated A/B tests for different design solutions and analyze test data in real time to help professionals choose the best version.
Enhanced project planning
A project plan is a detailed guide for the project team, and AI technology can come in handy when creating it. Developer teams, for instance, can provide AI analytics tools with historical data related to a company’s past software projects and they can forecast the time, financial resources, and workload required to build a new product, as well foresee potential project risks. This way, a team can create a more realistic project plan and increase the chances for the final product to be delivered on time and within budget.
Optimized product development
The process of writing code manually can be too inefficient and time-consuming, especially if a product is complex and feature-rich. Luckily, the use of AI technology allows development teams to streamline and automate a range of coding-related activities.
In particular, developers can use AI coding assistants with an autocomplete feature, providing recommendations on how best to continue or complete a specific line of code. As a specialist works on the code, an AI assistant can also detect errors and inaccuracies that might otherwise go unnoticed, simplifying further testing and reducing the risk of future software reworks.
Streamlined product testing
AI technology can also be used to streamline testing preparation and execution, two labor-intensive product development aspects. Specifically, AI tools can identify the most likely application usage scenarios based on user behavior analysis to help a testing team build test cases faster. AI tools can also execute tests automatically, analyze their results, and suggest actions needed to eliminate bugs.
More efficient and fast deployment
Manual software deployment processes are typically slow and error-prone, which is why they should also be optimized. AI-powered tools can be used to automate the rollout of new software releases, thus ensuring smoother and faster deployment. AI algorithms can also analyze historical deployment data and help a team identify bottlenecks in a deployment pipeline.
Better product support
AI technology can help a development team provide more efficient support to the product’s end-users, even after the active development phase is over. For example, AI algorithms can generate training materials based on rules and keywords specified by developers. AI algorithms can also monitor product performance after the launch to help the support team detect bugs or security vulnerabilities and fix any discovered issues timely.
Final thoughts
Building a top-quality product and delivering it on time and within budget is a highly challenging goal for any developer team, and keeping development processes efficient is essential to achieving it. AI technology can be used to streamline all aspects of product engineering, from business analysis, product design, and project planning to development, testing, deployment, and support.
Whether your product is intended for external or internal users, you should consider implementing AI tools in your SDLC. If you do not know which solutions you should adopt, an experienced technology partner can help you define the most suitable and cost-effective ones. If your team lacks the expertise to use them properly and build a product with the help of AI, a partner also can join in your project to guide them and provide technical assistance at any product development stage.
As the holiday season approaches, it’s time to spread cheer and appreciation with thoughtful gifts again. Developers, engineers, and tech enthusiasts dedicate countless hours to building and innovating, and they deserve a little holiday joy!
This year’s Developer Nation Gift Guide is packed with crowd-sourced ideas from our team & community, carefully curated to make any developer’s holiday season brighter. Whether you’re shopping for a colleague, a loved one, or treating yourself, this list has something for everyone.
{{ advertisement }}
1. Keychron Mechanical Keyboard
Nothing beats the tactile joy of a mechanical keyboard, and Keychron delivers an unbeatable blend of aesthetics and performance. A perfect gift for developers who spend long hours coding—they’ll love these ergonomic keyboards’ satisfying *click-clack*. Our community members love it, and we’re working with Keychron for a surprise treat, which we will announce soon. Subscribe to our newsletter and stay tuned for more 😉
—
2. Logitech MX Master 3 Mouse
Another favourite in our community is this ultimate productivity mouse, beloved by developers for its ergonomic design and precision. Its seamless multi-device connectivity and programmable buttons make it a game-changer for multitasking engineers.
—
3. YubiKeys 2FA USB Hardware Security Keys
Give the gift of digital security. YubiKeys offer top-notch two-factor authentication, ensuring developers can easily safeguard their online accounts.
For the organized developer—or one who could use a little help staying on top of tasks—these sticky notes bring analogue charm to their otherwise digital workspace.
Help developers block out distractions or enjoy a peaceful environment. These stylish earplugs offer adjustable noise reduction, which is ideal for deep work or noisy commutes.
—
6. Udemy Course Vouchers
Fuel their passion for learning! With Udemy vouchers, developers can explore new technologies, enhance skills, or explore personal interests.
Stay hydrated and save desk space with this eco-friendly, portable water bottle. Perfect for devs on the go or those glued to their screens.
—
9. Rode NT USB Mini Microphone
For developers dabbling in podcasts, streaming, or just crystal-clear Zoom calls, this compact microphone ensures they sound professional. Also the mic I use to record Developer Nation Broadcast Podcast 😉
—
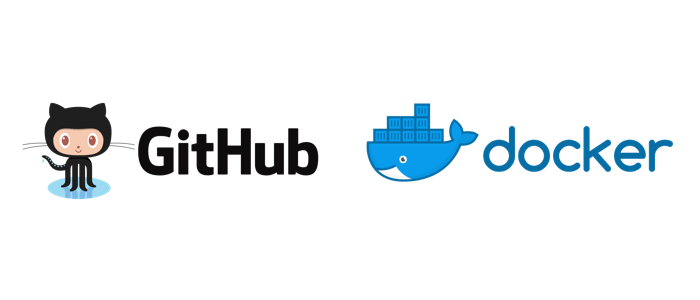
10. GitHub Team and Docker Pro Subscriptions
Boost their workflow with a subscription to GitHub Team or Docker Pro. Ideal for developers looking to optimize collaboration and containerization in their projects. We’re giving them away to our survey winners; participate here to Enter.
—
11. Mullvad VPN License
Privacy matters, especially to developers. Mullvad VPN is an excellent choice for those who value online security and anonymity.
—
12. Circuit Playground Express Board
Perfect for hardware enthusiasts, this board makes experimenting with circuits and coding easy and fun. Great for building creative projects. I highly recommend this for anyone who wants to get started learning Embedded Systems using MicroPython or CircuitPython.
—
13. *The 4-Hour Chef* book by Tim Ferriss
More than a cookbook, this book teaches rapid learning techniques through the lens of cooking. A unique gift for curious minds who love to hack their way to mastery.
—
14. Desk Plants
Bring a touch of green to their desks! Plants brighten up a workspace and boost mood and productivity—just make sure it’s a low-maintenance variety.
—
15. 1TB NVME M.2 SSD
Because you can never have too much storage. A lightning-fast SSD is a practical gift that any developer will appreciate. Don’t forget to pick a case with USB C to use as a portable high-speed SSD/flash drive.
—
16. Programmer Desk Coasters
Celebrate developer humour with these quirky coasters featuring cheat sheets for tools like Vim. A fun, functional addition to their workspace. Check them out here
—
17. Nintendo Switch
For gaming after hours or while on the road to work! The Switch is a perfect gift for developers who enjoy unwinding with a bit of fun and nostalgia.
—
18. Rio Grande Games Dominion Second Edition
Unleash their strategic side with this award-winning deck-building card game. A fantastic gift for game-loving devs who enjoy offline challenges.
—
19. Victorinox SD Multitool
Small, sleek, and endlessly useful. This multitool is perfect for quick fixes, both in the office and on the go. My personal favourite when it comes to fixing everyday errands.
—
20. G-Shock GSA 2100
The rugged, stylish G-Shock watch is perfect for developers who want durability and modern aesthetics in one package.
—
Wrapping Up
This holiday season, show your appreciation with gifts that blend practicality, fun, and geeky charm. Whether it’s improving their workflow, sparking creativity, or encouraging downtime, there’s something here to make every developer smile.
Wishing you all a joyous holiday season filled with warmth, gratitude, and maybe a few lines of celebratory code. Happy gifting!
—
What’s on your gift list this year? Share your ideas in the comments below! 🎁
As a developer, maintaining a high work productivity is crucial. However, transcribing scanned documents, mockup images, or text infographics slows down the process.
Having some experience in developing myself, I understand how irritating it can be when you have to manually transcribe something. But you can remove this irritation by leveraging image-to-text conversion tools.
These tools can save you time by accurately extracting the text, helping you maintain productivity. However, it is challenging to sift through the myriad of tools available to find the right one that caters to our needs. Hence in this blog post, I am going to bring down the top image-to-text conversion tools.
Shape the Future of Tech! Join the Developer Nation Panel to share your insights, drive tech innovation, and win exciting prizes. Sign up, take surveys, and connect with a global community shaping tomorrow’s technology. Join now.
These tools will smartly streamline your workflow so you do not need to worry about manual transcribing.
Top 4 Image-to-Text Conversion Tools
Below I am going to tell you about the top 4 image-to-text tools that can ease the workflow for you as a developer.
The first one on my list is Imagetotext.info. The tool is based on advanced open-source Tesseract OCR software and performs AI-based text extraction from images.
Before features, let me tell you why I consider this tool as the best option.
The first reason is that we can use it for free without any limited attempts. Second, I found its image processing speed faster than others.
Third, its availability as a mobile app, web app, and desktop app makes it a more compatible option.
Key Features:
Imagetotext.info boasts the following features:
Processes image files in multiple formats
Allows processing images that are available online
Offers multilingual support
Integrated with 12 other tools
OCR-based extraction brings high accuracy in output
Can process a batch of images in one go
Pricing:
As I have told you, the Imagetotext.io is free to use (unlimited). But its free version only accepts 3 images at a time. To process a bigger number of images, you have to opt for a premium plan. Currently, it is offering 3 premium plans that are priced as follows:
The second-best image-to-text converter on my list is Ocr.best. As the name suggests, it also uses optical recognition technology paired with machine learning.
This tool is very similar in most of the features to the previous one and can even detect mathematical syntax that’s present in images and scanned docs.
And as a developer, you already will be aware of the importance of mathematical syntax.
Key Features:
Ocr.best brings the following set of features to users:
Supports image files in various formats, including PDFs
Available in multiple languages for wider accessibility
Allows processing of images directly from online sources
App available for Android and iOS
Handles more than one image in one go
Pricing:
Like Imagetotext.info the free version of this tool also allows you to submit 3 different images (up to 10 MB in size) at a time. But by having a premium subscription you can process up to 50 images in one go. The pricing is almost the same as the previous one but there’s just a slight difference.
Image-to-text converter by Prepostseo is another top choice when it comes to converting images into text. The platform is known for providing free access to a variety of tools.
The reason I consider it among the top options is that it can handle large-size image files (up to 20MB). This limit is double the number of the previous two.
But here a question arises in mind. If its limit is higher than others, why have I kept this tool at third position? Well, that’s because it doesn’t support PDF files. This means you cannot extract text from images available as a PDF file using this tool.
Key Features:
The Image to Text Converter by Prepostseo has the following features:
Come with a good UI/UX that makes it simple to use
Offers good compatibility both on phone and desktop devices
Allows processing online images by link submission
Provides downloading the output text in two formats i.e., TXT and Word document
Detects mathematical syntax and handwritten texts
Pricing:
The pricing of this tool is higher than the other. But when you look at its features like the accurate output organized in a Word document and the large image file size limit, it seems to be justifiable. Plus, another notable thing is that the premium plan doubles the submission limit further to 20MB files at a time.
The image-to-text converter by Prepostseo doesn’t offer a weekly plan but has a monthly and yearly plan.
This tool by Google also performs the extraction of text from images. However, there are many limitations. For example:
You can submit only one image at a time
It doesn’t provide text as a file in any format, you can only copy the text, not download it
Process is a bit lengthy
Key Features:
Google Lens offers the following features to users:
Free to use
Available as a mobile app and in the browser
Can take you to the image source
Works without internet for certain languages
Translates extracted text into numerous languages on the spot
Takeaway
As developers, time is a luxury for us and we cannot afford to lose it. Whenever there comes a need to extract text from images the 4 tools that I have discussed above can be reliable solutions. By integrating them into your workflow, you’ll not only streamline your tasks but also maintain productivity.
Developers may have the best programming skills, but a great resume will not necessarily help you build a successful developer career. The days of programming alone in front of your computer are gone, replaced by collaborative teams sharing project objectives and responsibilities.
Shape the Future of Tech! Join the Developer Nation Panel to share your insights, drive tech innovation, and win exciting prizes. Sign up, take surveys, and connect with a global community shaping tomorrow’s technology. Join now.
To land a job and build a career, you must improve your soft skills. These are traits that help you work well alongside your colleagues. You’ll also need to learn effective communication to enhance teamwork. Leadership skills are also necessary for your future growth.
You can ease into soft skills by improving your development skills through continuous learning.
Critical Skills for Developers
To launch a successful career, you must stay competitive in the development industry. You must be adaptable and keep up-to-date as technology rapidly changes. Continuous learning helps developers just starting out remain employable by teaching them advanced and new programming abilities.
Training opportunities also broaden your connections with industry professionals who can provide opportunities. These networking skills are necessary to get your foot in the door of a good company. You can connect with professors, instructors, programmers, and others by:
Taking training courses that help you keep your finger on the pulse of the industry;
Attending tech conferences to meet industry leaders;
Participating in coding challenges at sites like LeetCode, HackerRank, and CodeSignal to build and improve programming skills;
Working on open source projects on GitHub to build your resume;
Networking inside developer communities on platforms like LinkedIn.
It’s not just coursework and training. Subscribing to the right publications, such as TechCrunch, keeps you abreast of emerging technologies to stay current on the latest trends.
While becoming ingrained in the tech community, you should develop the soft skills necessary for the workplace.
Working Alongside Your Colleagues
Working inside a team can be a new experience for beginner programmers, but it is necessary in the modern workplace. You can develop and improve your collaboration skills in DevOps, a popular way to organize teams programming teams today.
DevOps creates a collaborative operation between the programming and IT teams. They work in tandem on a project rather than separating their efforts into two different functions. This streamlines the process but requires collaboration between developers and operations. This system works by how those in charge define it. You may be part of a multi-faceted group, with multiple additional teams added, such as website managers.
In DevOps, collaboration is the key to success. Teams must resolve any technical challenges while working well together. Solving problems is a group effort. Proper coordination among DevOps members ensures the project progresses smoothly. Work-in-progress tasks are visible to all through tools like remote access and workflow software, so you must be comfortable with this level of visibility.
It might take time, but having the workplace flexibility that DevOps requires is a marketable skill. And, like any collaborative effort, strong communication skills are fundamental.
Developing Communication Skills
Developing communication skills is not always easy, but improving this soft skill will boost your career. It requires you to listen thoughtfully when others speak, respond calmly and logically, and clearly state your goals and needs. One way to transform your performance at work is to listen to employee feedback. This is especially crucial as you take on leadership roles that require tasks such as performance evaluations and resolving employee conflicts.
Seeking feedback from colleagues and team members helps you to grow. Acting on this information creates a healthy workplace atmosphere with less conflict. Most employees appreciate feedback as it can reduce miscommunication, errors, and wasted time. Being honest and open with teammates encourages them to reciprocate, especially if you’re working in a DevOps environment.
When you’re in a leadership role, you can use personal interviews, anonymous surveys, and focus groups to gather this feedback. In addition to evaluating areas that need improvement, employee feedback helps improve employee engagement. Employees are more satisfied with work, which typically reduces turnover rates. This crucial component leads to project success and creates a workplace culture of trust and transparency.
Communication is a necessary skill to do your job well. However, managing projects well can be just as valuable.
Skills for Managing Projects
Project management skills can expand your opportunities and are foundational in any task that requires you to oversee and deliver results. In addition to communication and collaboration, several foundational traits are necessary, including:
Time management is necessary to establish timelines, including milestones and deadlines, prioritizing objectives, and accurate project status updates.
Organizational skills are necessary to understand where everyone fits into the project puzzle and to ensure everyone is on task so deliverables arrive on time.
Problem-solving skills are required when problems or issues arise that may delay or halt the project.
Negotiation and management skills are required to boost productivity and secure cost-effective solutions.
Project management is an excellent stepping stone for promotion to upper-level management, requiring soft skills that are valuable at every level.
While solid technical expertise is necessary to launch your developer career, soft skills will ensure long-term growth. Collaboration, communication, and project management skills are foundational for thriving and succeeding in the workplace.
This technology enables many individuals and industries to streamline their workflow by digitizing data for easy access and storage.
Plus, the advanced OCR tools come with batch-processingcapabilities. So, they can extract text from multiple images at once. This feature allows companies to create large datasets that they can later utilize to make well-informed decisions.
In this post, we will discuss how OCR helps in extracting text from multiple images at once. We will also learn the way to leverage a tool from the internet to complete day-to-day tasks.
Shape the Future of Tech! Join the Developer Nation Panel to share your insights, drive tech innovation, and win exciting prizes. Sign up, take surveys, and connect with a global community shaping tomorrow’s technology. Join Now
How OCR Works: The Basics
We will start-off by highlighting the basics of OCR and how it works to extract text from multiple images at once.
1. Image processing
Images are cleaned and prepared for the text recognition process. The OCR engine binarizes (converts the image to black and white), reduces the noise, corrects the skew, and then detects the edges of characters so they’re clearly captured.
2. Text Detection
After preprocessing, the OCR engine detects areas of the image that likely contain text. These segregated areas are processed further by detecting a gradient in brightness between the text and the background color. For this step, algorithms such as convolutional neural networks (CNNs) can be used to detect text regions.
3. Character Segmentation
In this step, the OCR engine breaks the detected text regions into individual lines and characters. Connected component analysis is used by some systems and contours by others to find characters.
However, the challenge here is to correctly distinguish between letters that touch each other or are spaced irregularly.
4. Pattern Recognition (Character Recognition)
This is the heart of OCR process and can happen in two primary ways:
Template Matching: Training the algorithms to compare each detected character to a database of known patterns. The engine does its best when the fonts and size does not change, but cannot handle different font or style variations.
Feature Extraction: The approach extracts distinct features of each character (given by lines, curves, and intersections), and applies algorithms such as k nearest neighbors (KNN) or neural networks to recognize the text.
5. Post-Processing
Once the characters are recognized, post-processing corrects errors and improves accuracy. For example, the system can use a dictionary to fix misrecognized words or apply NLP models to predict and fix common OCR mistakes such as reading “rn” as “m.”
Ways OCR Helps Getting Text from Multiple Images
When the OCR technology first started to commercialize, there were a lot of limitations. First, the software and tools were mostly licensed and paid. Secondly, you couldn’t process many images at once; it was one at a time and a very time-consuming process.
From that, we’ve come a long way. The OCR tools that we have today are much faster and more robust than in the past, one of which we will discuss in this article. We will also see how the advanced tech supports batch-processing capabilities while maintaining accuracy.
1. Batch-Processing
Newer OCR tools allow users to upload many image files at once for conversion. This is called batch-processing and it allows companies with big data sizes to quickly digitize their physical documentation.
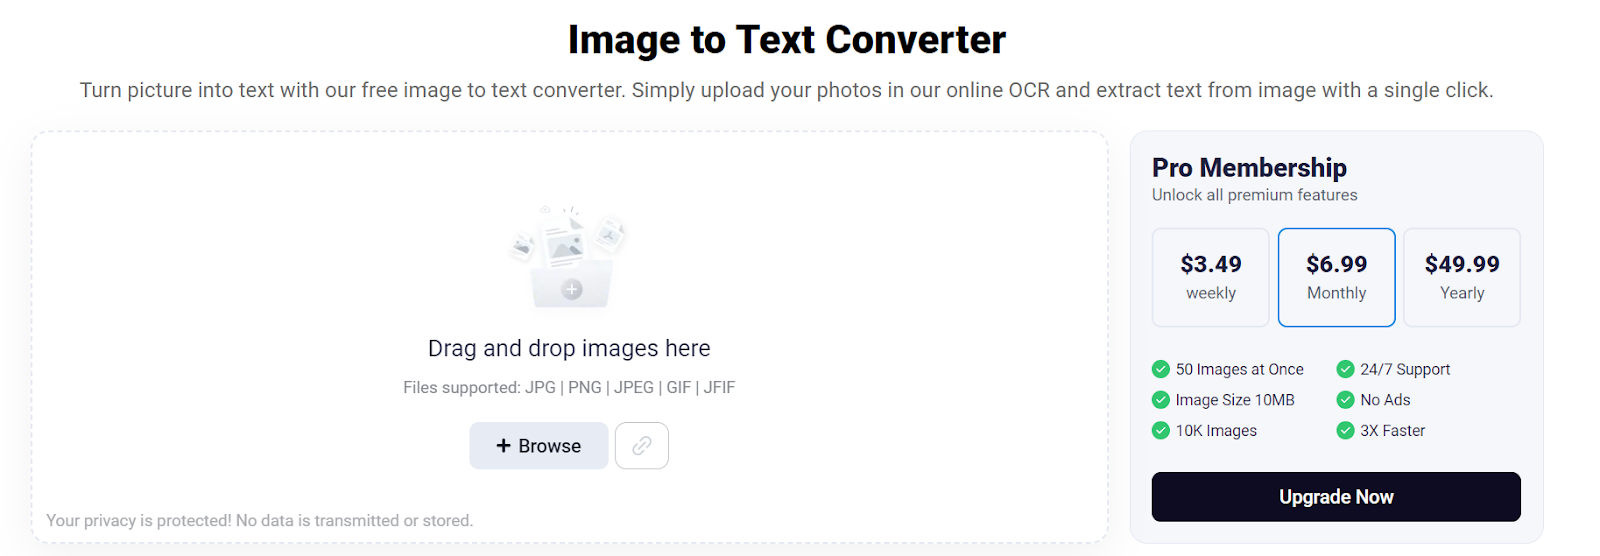
A tool that we think is necessary to mention here is the Imagetotext.io. It helps users process 50 images at once with lightning-fast speeds and high accuracy.
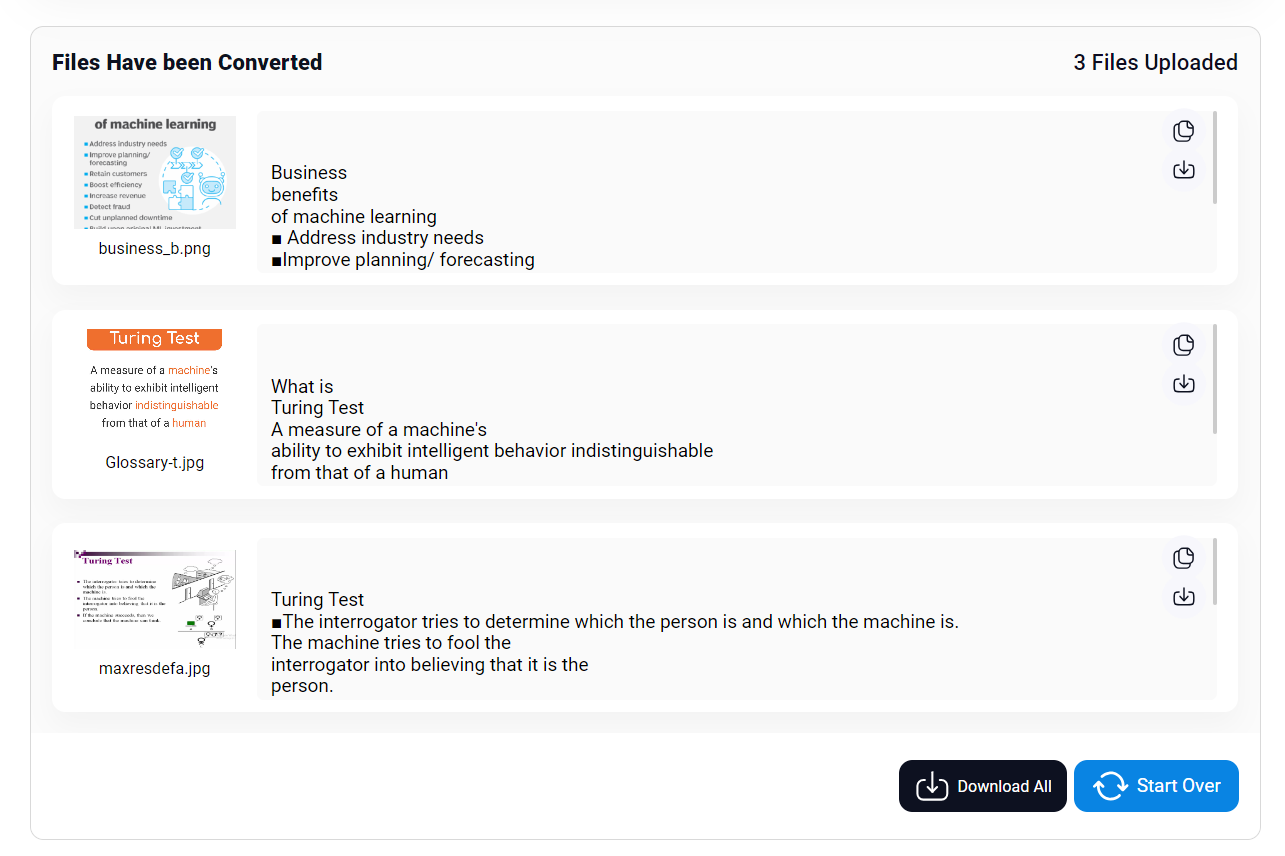
The OCR tool has a very minimalist user interface, which keeps the learning curve much gentler. To use the tool, we simply dragged and dropped the image files into the interface to receive the following output.
The text was immediately extracted for all the 3 files we uploaded to this OCR tool. If we want to do this for more images, then purchasing the premium package with some additional features might be the way to go.
Thus, explicitly showing how imagetotext.io has accurate batch-processing capabilities for handling a large sample size of documents.
2. Multi-Format Image Support
Not only batch-processing, but the advanced OCR tools (like the one we just mentioned) are also capable of supporting multiple file formats. These include:
PNG
JPG
JPEG
WEBP
BMP
TIFF
And more …
This support for a vast range of image formats makes OCR technology perfect for different use cases. A person working on freelance projects can directly fetch an image from the internet using its URL to convert it to editable text.
Similarly, an organization with a wide team structure working with complex imagery in TIFF format can get the text in editable form using the tool we discussed. All of these things elevate the functionality of individuals or work teams, immensely boosting their productivity.
3. Maintaining High Accuracy
As we saw in the pictorial demonstration, modern-day OCR tools are capable of maintaining their high accuracy during batch-processing of images.
This feature makes the technology crucial for eliminating errors associated with manual data entry. Thus, making the information that reaches the databases accurate and dependable.
Besides that, a pristine text extraction process ensures that there is no loss of data, making the knowledge bases comprehensive.
However, it is never a bad idea to cross-check the extracted text so that you can avoid the rare slip-ups that these tools can sometimes make.
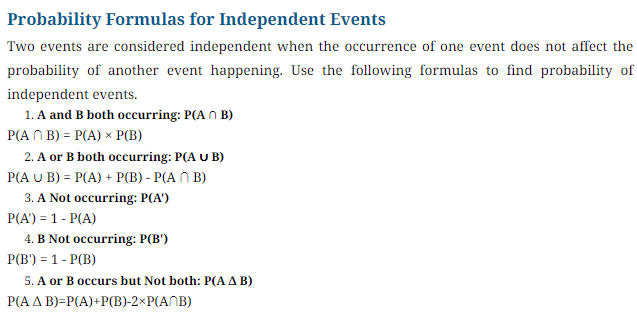
4. Layout Preservation
ML algorithms have developed so quickly that the OCR tools can now ensure layout preservation of text almost every time. As an example, consider the image below with advanced mathematical text.
Let us put the mentioned OCR tool to test with this image and see if it can retain the layout (mathematical symbols, etc.) in the extraction process.
Indeed, achieving such layout preservation levels for OCR tools is a statement that our technology is advancing at a rapid pace. Thus, no matter how many images you put in for the process, there will be no variation in the textual formatting of the extracted data.
Thus, image-to-text conversion isn’t just limited to digitizing information. But, the technology can also be used to make one-stop solutions for users where everything is done accurately and rapidly.
Companies can also leverage OCR to add accessibility features like TTS (Text-to-Speech) to their platforms. This can allow visually impaired individuals to navigate websites conveniently, thus adding inclusivity to the user experience (UX).
There are many more ways OCR helps to extract text and integrates with other applications or APIs. However, we’ve mentioned some of these in this post just to give you an idea of how this technology can help scale up your business.
Technical Details for Developers
For a developer, building or integrating OCR requires understanding some of the following aspects.
1. Image Preprocessing Techniques
Binarization: Converting gray images to binary makes OCR engines detect text easier, and algorithms such as Otsu’s method or adaptive thresholding are used for that.
Noise Reduction: Median filtering and morphological operations (like dilation and erosion) are techniques for cleaning the image, that is, removing irrelevant noise.
Skew Detection and Correction: A popular way to look for skew in scanned images and turn them back into horizontal orientation is to use Hough Transform.
2. Machine Learning and Deep Learning Techniques
Modern OCR systems often use deep learning models like CNNs for recognizing characters, words, and even handwritten text. LSTM (Long Short Term Memory) neural network has been integrated by tools such as Tesseract (an open source OCR engine) to deal better with complex text layouts, resulting in higher recognition accuracy.
3. Handling Different Languages and Scripts
OCR must be adaptable to different languages, fonts, and character sets. Mostly, we train the model on several datasets including mundane English words, English named entities (e.g., @realDonaldTrump), Chinese characters, Japanese characters, Arabic, and other right-to-left languages.
OCR systems can be fine tuned with specific datasets, to increase accuracy. But, this requires enough understanding and working experience with APIs and model training.
4. Accuracy Improvements
To enhance accuracy, OCR systems can be fine-tuned with specific datasets. Training custom models for industry specific fonts or handwriting style is vital for OCR use cases like reading of financial forms, invoices or legal documents.
A lot of developers include OCR by utilizing Google Cloud Vision APIs, AWS Textract or Microsoft Azure Cognitive Services.
5. Real-Time OCR
For mobile or camera-based applications, real-time OCR adds another layer of complexity, requiring efficient algorithms that work on lower-quality images and in varied lighting conditions. Developing applications under such conditions requires developers to optimize for processing times and to cope with lower resolution or motion blur.
Conclusion
OCR tools use machine learning algorithms to extract text from images, enabling individuals and industries to quickly digitize data for easy access.
Advanced OCR tools support batch processing, allowing for the extraction of text from multiple images simultaneously.
This technology maintains high accuracy, preserves layouts, and can integrate with other useful tools, making it a valuable asset for enhancing productivity and accessibility in various big-scale applications.
Among the many languages used in backend development, Go and Rust emerge as compelling options, each with its own unique strengths. Go, created by Google, is known for its simplicity and performance in distributed systems and microservices. Meanwhile, Rust, developed by Mozilla, has gained attention for its focus on safety and memory management.
In this post, we explore the current adoption of Go and Rust among backend developers, drawing insights from SlashData’s latest Developer Nation survey, which ran in Q3 2024 and reached more than 2,700 backend developers worldwide. We’ll dive into key questions like: How popular are Go and Rust in the backend developer community? How has their usage evolved over time? In which geographic regions are these programming languages more popular?
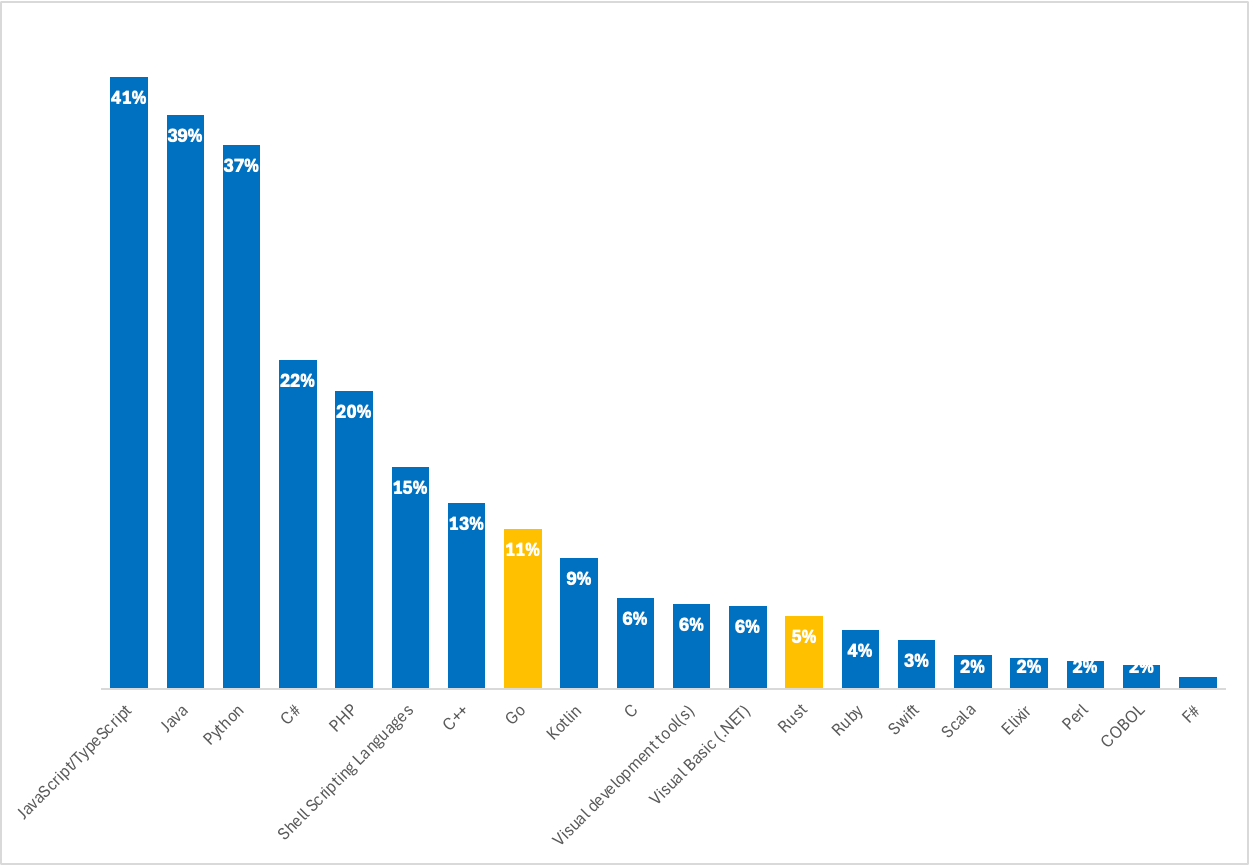
According to our latest survey data, 11% of backend developers currently use Go, while only 5% use Rust. Despite their appeal to developers working on scalable, high-performance applications, more versatile languages like JavaScript/TypeScript (41%), Java (39%), or Python (37%) dominate the space, with over a third of backend developers using them.
Over the past 2.5 years, the adoption of Go and Rust among backend developers has remained stable, with no significant variations in their usage. However, while the share of backend developers using these programming languages hasn’t increased, the size of both the Go and Rust communities has grown alongside the overall increase in the backend developer population, which has grown by over 700,000 developers during this period.
The “Adoption of programming languages among backend developers” study, based on a sample size of 2,754 respondents, asked the question: “Which programming languages do you use to write code that runs on the server or in the cloud?” and provides an overview of the percentage of backend developers using various programming languages.
Regional adoption of Go and Rust among backend developers
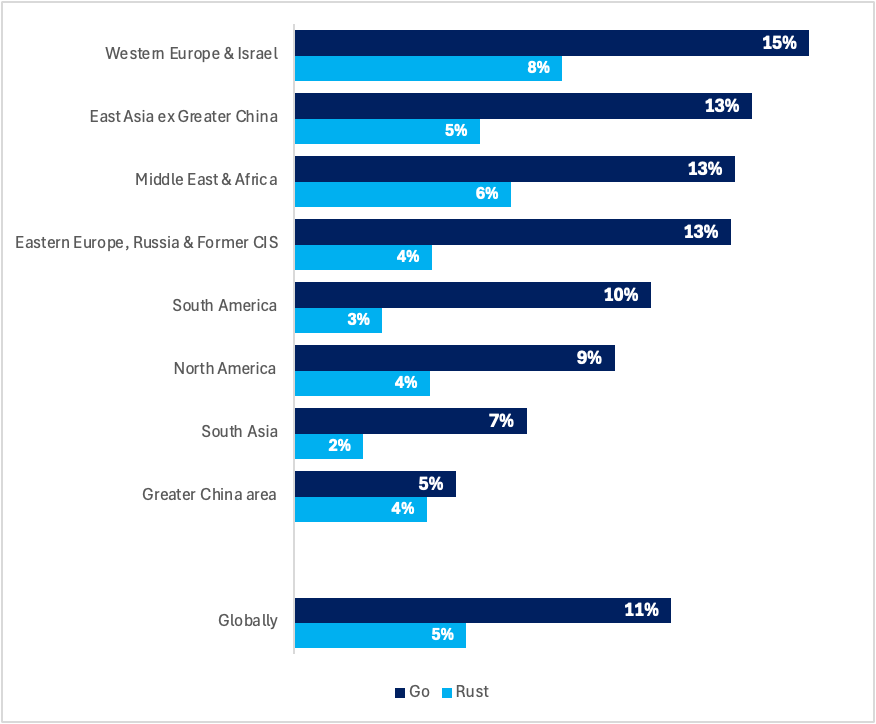
Examining the adoption of Go and Rust from a regional perspective reveals some interesting patterns. Western Europe leads with the highest adoption rates of both Go (15%) and Rust (8%), indicating a strong interest in these programming languages. In addition to Western Europe, East Asia, and the Middle East & Africa show average or above-average adoption rates for both languages.
On the other hand, both Go and Rust see below-average adoption among backend developers in South America, North America, South Asia, and China. These lower adoption rates may reflect regional preferences for different technology stacks or a slower adoption of these newer technologies. Notably, Go’s adoption is lowest in China (5%), while Rust has its weakest presence in South Asia, where only 2% of backend developers use it.
The “Regional adoption of Go and Rust” report, based on a sample of 2,754 backend developers, examines the percentage of developers in each region using these languages for server or cloud code, as outlined in the “regions” tab.
The usage of Go and Rust among professional backend developers
The backend development community has one of the highest concentrations of professionals in the software development ecosystem, with 85% of backend developers involved professionally in the space. This trend is even more pronounced in the adoption of Go and Rust, as both are more likely to be used by professional backend developers than hobbyists and students, in contrast to other languages like JavaScript/TypeScript, Python, or C++.
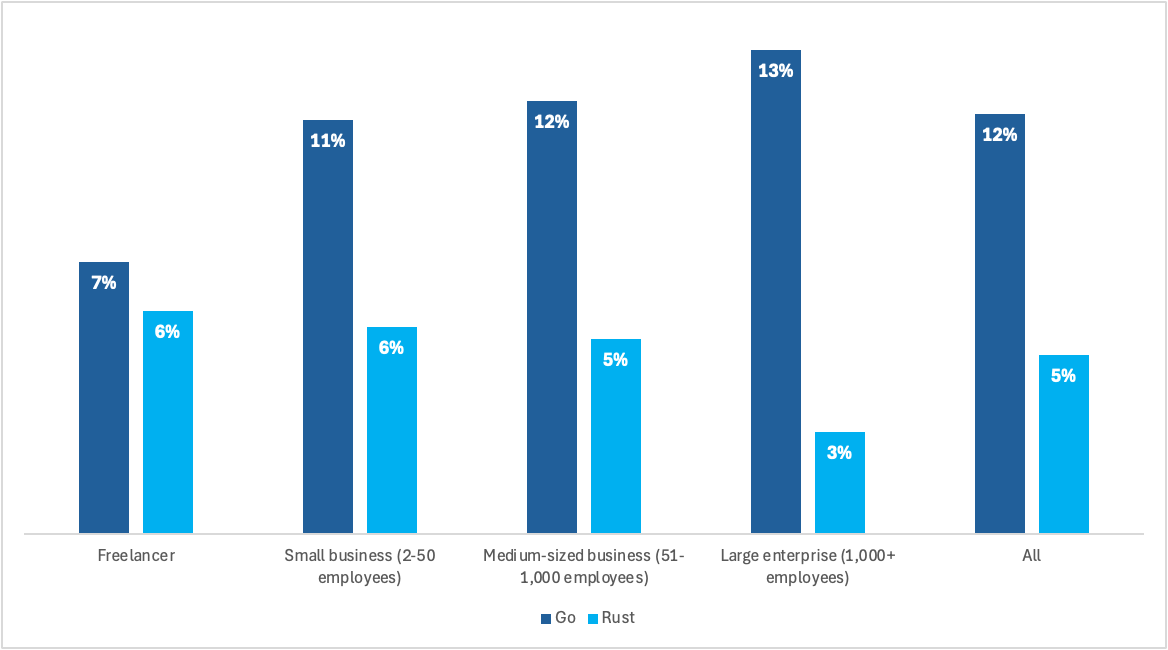
When analysing Go and Rust adoption across companies of different sizes, we observe opposite trends. The usage of Go increases with company size, rising from 7% among freelance backend developers to 13% among those working for large enterprises with over 1,000 employees. In contrast, the adoption of Rust halves, from 6% among freelancers to only 3% within large organisations.
By creating Go, Google aimed to address the challenges of building large, efficient, and scalable systems. With its focus on simplicity, performance, concurrency, and developer productivity, Go becomes increasingly attractive to larger enterprises, especially those that manage vast cloud infrastructures, microservices, or backend systems where scalability and performance are critical.
On the other hand, smaller companies, particularly startups or niche firms, often focus on highly specialised areas such as blockchain, security, and performance-critical applications, where Rust truly shines. Moreover, smaller companies tend to be less bound by legacy systems or established tech stacks, allowing developers to experiment more freely with modern languages like Rust, which has been around for less than a decade.
Finally, let’s conclude this blog post by comparing the industries with the highest adoption rates of Go and Rust. Our data reveals that Go is most popular among backend developers working for companies in the tourism and hospitality (19%), automotive and marine (18%), and telecommunications and networks (18%) industries. Conversely, Rust enjoys its highest popularity among backend developers in automotive and marine (12%), hardware products (12%), and insurance (10%).
The “Adoption of Go and Rust by company size” analysis, based on a sample of 2,475 professional backend developers, details the percentage of developers using these languages across different company sizes for server or cloud code, as shown in the “csize” tab.
Are you a Go or Rust user? We would love to hear from you. Participate in our latest survey, help shape the future of technology and win great prizes.
About the author
Álvaro Ruiz Cubero
Market Research Analyst
Álvaro is a market research analyst with a background in strategy and operations consulting. He holds a Master’s in Business Management and believes in the power of data-driven decision-making. Álvaro is passionate about helping businesses tackle complex strategic business challenges and make strategic decisions that are backed by thorough research and analysis.
In today’s fast-paced digital world, chatbots have become essential for businesses, enhancing customer engagement and streamlining operations. Integrating AI into the chatbot development life cycle can significantly improve their functionality, making them smarter, more responsive, and efficient. This guide will explore the stages of the chatbot development life cycle, the tools and technologies involved, and provide insights into creating an AI-powered chatbot.
Understanding the Chatbot Development Life Cycle
Approximately 1.4 billion individuals currently use chatbots. The chatbot development life cycle encompasses several key stages, each crucial for building an effective chatbot.
Requirement Analysis and Planning
The journey begins with understanding the needs and expectations of the users. Imagine a company that wants a chatbot to handle customer service inquiries. They need to:
Identify the chatbot’s purpose.
Define the target audience.
Set clear objectives and goals.
Outline key functionalities and features.
For instance, they might decide the chatbot should answer common questions, guide users through the website, and handle basic troubleshooting.
Designing the Chatbot
Designing a chatbot involves creating the conversational flow and user interface. Picture a creative team brainstorming the chatbot’s personality. They decide it will be friendly and helpful, reflecting the company’s brand. They then craft the conversation script, design the user interface, and create a personality for the chatbot. The result is a chatbot that feels like a natural extension of the company’s customer service team.
Choosing the Right Tools and Platforms
Selecting the right tools and platforms is crucial. Here are some popular choices:
Dialogflow: Powered by Google, it’s great for complex conversational flows with robust natural language processing (NLP) capabilities.
Microsoft Bot Framework: A comprehensive framework supporting multiple channels like Skype, Slack, and Facebook Messenger.
Rasa: An open-source framework that allows for highly customizable chatbots with advanced NLP capabilities.
Each platform has its strengths. Dialogflow excels in ease of use, Microsoft Bot Framework is perfect for extensive integrations, and Rasa offers high customization. For businesses seeking tailored solutions, MOCG generative AI consulting can further enhance the capabilities of these platforms, providing specialized expertise to meet unique requirements.
Development and Integration
Now comes the actual building of the chatbot. Imagine a team working together, coding, and integrating the chatbot with various platforms. They might choose Rasa for its flexibility. The team sets up the environment, trains the model, and starts running the chatbot. They then integrate it with Slack, allowing users to interact with the chatbot directly within their preferred communication tool.
Testing and Debugging
Testing is a critical phase. Think of a meticulous QA team putting the chatbot through its paces. They conduct:
Unit Testing: Ensuring each part of the chatbot works individually.
Integration Testing: Making sure all parts work together seamlessly.
User Acceptance Testing (UAT): Gathering feedback from real users.
The goal is to iron out any kinks and ensure the chatbot provides a smooth user experience.
Deployment
Deploying the chatbot involves making it available to users on chosen platforms. Picture the excitement as the team finally releases their creation to the world. They might use cloud services like AWS or Google Cloud, or opt for containerization with Docker or Kubernetes, ensuring the chatbot is scalable and robust.
Maintenance and Improvement
The work doesn’t stop after deployment. Continuous monitoring and improvement are essential. Imagine a dedicated team analyzing user interactions, fixing bugs, and adding new features. They use tools like Google Analytics to track performance and Mixpanel to understand user behavior. This ongoing process ensures the chatbot remains relevant and effective.
AI Integration in Chatbot Development
Integrating AI into the chatbot development life cycle enhances its capabilities in several ways:
Natural Language Processing (NLP)
AI-powered NLP allows chatbots to understand and process human language more effectively. For instance, a customer might ask, “Can you help me track my order?” The chatbot recognizes the intent (tracking an order) and the entity (the order itself), providing a precise response.
Machine Learning
Machine learning algorithms enable chatbots to learn from interactions and improve over time. Imagine a chatbot that gets better at answering questions as it interacts with more users, thanks to supervised learning and reinforcement learning techniques.
Sentiment Analysis
AI-powered sentiment analysis helps chatbots understand the emotions behind user input, enabling more empathetic responses. For example, if a user expresses frustration, the chatbot can offer a soothing and helpful response, improving customer satisfaction.
Case Study: Building an AI-Powered Customer Support Chatbot
Let’s walk through a practical example of building an AI-powered customer support chatbot.
Step 1: Creating the Concept
Picture a company deciding they need a chatbot to handle customer support inquiries. They outline the chatbot’s purpose, target audience, and key functionalities.
Step 2: Designing the Experience
The creative team designs a friendly, helpful chatbot that aligns with the company’s brand. They draft conversation scripts, design the user interface, and give the chatbot a personality that resonates with users.
Step 3: Choosing the Platform
The team opts for Dialogflow due to its robust NLP capabilities and ease of integration with their existing systems.
Step 4: Building the Chatbot
The development team sets up Dialogflow, creates intents for common customer inquiries, and integrates the chatbot with the company’s website. They work diligently, ensuring the chatbot understands and responds accurately to user queries.
Step 5: Testing and Refining
The QA team rigorously tests the chatbot, ensuring it handles various scenarios smoothly. They gather feedback from beta users and make necessary adjustments to improve the user experience.
Step 6: Going Live
With everything in place, the team deploys the chatbot on the company’s website. Customers can now interact with the chatbot, receiving instant support for their inquiries.
Step 7: Continuous Improvement
Post-launch, the team continuously monitors the chatbot’s performance, making updates and improvements based on user feedback and interaction data. This ongoing process ensures the chatbot remains a valuable tool for customer support.
Trends in AI-Powered Chatbot Development
Based on Research by SlashData – 15% of ML/DS developers use machine learning to build new ML or AI-based products, applications or chatbots. The integration of AI in the chatbot development life cycle is continuously evolving. Here are some trends to watch:
Conversational AI
Conversational AI aims to create more human-like interactions by understanding context and generating natural responses. This means chatbots are becoming more sophisticated, capable of engaging in more complex and meaningful conversations.
Multilingual Chatbots
With global businesses, there is a growing demand for chatbots that can converse in multiple languages. This trend is driven by the need to provide support to a diverse customer base.
Voice-Enabled Chatbots
Voice-enabled chatbots are gaining popularity, providing users with a more intuitive and hands-free experience. As voice technology improves, we can expect to see more businesses adopting voice-enabled chatbots.
Hyper-Personalization
AI enables chatbots to provide highly personalized responses based on user data and behavior. This trend is leading to more tailored and relevant interactions, enhancing the overall user experience.
Future-Proofing with AI
As AI technology advances, the chatbot development life cycle will become more streamlined, with AI handling more complex tasks and reducing development time. Businesses that embrace these advancements will be better positioned to provide superior customer experiences and stay ahead of the competition.
Conclusion
Integrating AI into the chatbot development life cycle significantly enhances the capabilities and efficiency of chatbots. By following a structured approach and leveraging the right tools and technologies, businesses can create powerful, intelligent chatbots that drive engagement and deliver exceptional value to users. This journey, from planning to continuous improvement, highlights the dynamic and transformative nature of AI in chatbot development.
As remote work continues to be the norm, the demand for efficient and secure remote access software has never been higher. Businesses need tools that not only provide seamless connectivity but also ensure security, reliability, and ease of use. Here, we delve into the top 10 remote access software tools of 2024, each offering unique features to cater to a variety of needs.
1. Zoho Assist
Overview: Zoho Assist is a comprehensive remote access and support solution that caters to businesses of all sizes. With its cloud-based architecture, it allows IT professionals to provide remote support and access unattended computers from anywhere.
Key Features:
Unattended remote access
Multi-platform support (Windows, Mac, Linux)
Screen sharing, file transfer, and chat capabilities
Integration with other Zoho products like Zoho Desk and Zoho CRM
Pricing: Zoho Assist offers a free plan for one user with basic features. Paid plans start at $10 per month.
2. Atera
Overview: Atera is an all-in-one remote monitoring and management (RMM) platform that includes remote access features. It’s designed primarily for managed service providers (MSPs) and IT professionals, offering a range of tools for monitoring, managing, and supporting IT infrastructure remotely.
Key Features:
Remote desktop and file transfer capabilities
Automated patch management
Real-time alerts and monitoring
Integration with PSA (Professional Services Automation) tools
Pricing: Atera’s pricing is subscription-based, starting at $79 per technician per month.
3. ManageEngine Remote Access Plus
Overview: ManageEngine Remote Access Plus is a powerful remote access tool designed for IT teams. It provides advanced features for troubleshooting and managing remote endpoints, making it a preferred choice for enterprises with extensive IT infrastructure.
Key Features:
Remote control with multi-monitor support
Remote file transfer and command execution
Video recording of remote sessions
Support for Windows, macOS, and Linux
Pricing: ManageEngine Remote Access Plus offers a free edition for up to 10 computers, with paid plans starting at $95 per technician per year.
4. Zendesk Remote
Overview: Zendesk Remote is part of the Zendesk Suite, which is widely known for customer support solutions. Zendesk Remote integrates remote access directly into customer service workflows, enabling support teams to assist customers efficiently.
Key Features:
Seamless integration with Zendesk Support
Remote control and screen sharing
Session recording for quality assurance
Real-time chat and communication during support sessions
Pricing: Zendesk Remote is included in the Zendesk Suite, with plans starting at $49 per agent per month.
5. Zoho Remotely
Overview: Zoho Remotely is a remote work suite designed to help teams stay connected and productive from anywhere. While it includes a variety of collaboration tools, its remote access capabilities are a standout feature for businesses looking to manage remote teams effectively.Integrating effective email marketing software in USA alongside these tools can further enhance your communication strategy, allowing you to reach your audience with targeted campaigns and optimise business outcomes.
Key Features:
Remote desktop access
Project management and collaboration tools
Secure file storage and sharing
Integrated communication via chat, video, and voice
Pricing: Zoho Remotely offers a free plan with limited features, while paid plans start at $10 per user per month.
6. Freshservice
Overview: Freshservice is an IT service management (ITSM) tool that includes robust remote access capabilities. It’s designed to help IT teams manage and support their organizations’ technology infrastructure, making it an excellent choice for medium to large enterprises. corporating payroll software alongside tools like Freshservice ensures that businesses can manage both their IT infrastructure
Key Features:
Remote control and screen sharing for troubleshooting
Automated workflows for incident management
Asset management and configuration management database (CMDB)
Integration with other Freshworks products
Pricing: Freshservice plans start at $19 per agent per month.
7. ISL Online
Overview: ISL Online is a remote desktop software solution known for its reliability and security. It’s particularly popular among IT support teams and customer service departments that require secure, fast, and easy-to-use remote access tools.
Key Features:
Remote desktop access with high-security standards
Unattended access and session recording
Cross-platform support (Windows, Mac, Linux, Android, iOS)
Branding and customization options
Pricing: ISL Online offers flexible pricing options, with a basic plan starting at $145 per year.
8. Wayk Now
Overview: Wayk Now is a versatile remote desktop access tool designed for IT professionals who need to manage and support remote systems. It provides an easy-to-use interface combined with powerful features to ensure seamless remote access.
Key Features:
Instant remote access without prior installation
Cross-platform support (Windows, Mac, Linux)
Secure file transfer and clipboard sharing
Integrated chat and collaboration tools
Pricing: Wayk Now offers a free version with basic features, and paid plans start at $15 per user per month.
9. SpatialChat
Overview: SpatialChat is a remote collaboration tool with a focus on creating virtual workspaces. While not a traditional remote access tool, it provides a unique way for remote teams to interact and collaborate in a virtual environment, making it ideal for distributed teams.
Key Features:
Virtual meeting rooms with spatial audio
Screen sharing and media sharing
Customizable virtual office layouts
Integration with other collaboration tools
Pricing: SpatialChat offers a free plan with limited features, and paid plans start at $49 per month.
10. Loop Team
Overview: Loop Team is designed to replicate the in-office experience for remote teams, offering a platform that combines video conferencing, messaging, and collaboration with remote access features. It’s ideal for teams that want to maintain a high level of communication and collaboration while working remotely.
Key Features:
Persistent virtual rooms for ongoing team collaboration
Screen sharing and remote control capabilities
Meeting recording and transcription
Integration with productivity tools like Slack and Google Workspace
Pricing: Loop Team offers a free version with basic features, with paid plans starting at $8 per user per month.
Conclusion
The diverse range of remote access tools available in 2024 ensures that businesses and individuals can find the perfect solution to meet their needs. Whether you require a robust IT management platform like ManageEngine Remote Access Plus, an all-in-one remote work suite like Zoho Remotely, or a unique virtual collaboration environment like SpatialChat, there’s a tool to fit every scenario. As remote work continues to evolve, these tools will play a critical role in ensuring that teams stay connected, productive, and secure, no matter where they are in the world.